>As of WordPress 3.0, you have the ability to create a network of sites by using the multisite feature.
Step 1: Prepare Your WordPress
Your existing WordPress site will be updated when creating a network.
Unless this is a fresh install and you have nothing to lose, please backup your database and files.
Verify that Pretty Permalinks work on your single WP instance.
Also deactivate all active plugins. You can reactivate them again after the network is created.
Step 2: Allow Multisite
Open up >site root folder Edit wp-config.php and add this line above where it says /* That's all, stop editing! Happy blogging. */. If it doesn't say that anywhere, then add the line somewhere above the first line that begins with require or include:
/* Multisite */
define( 'WP_ALLOW_MULTISITE', true );
You will need to refresh your browser to continue.
Step 3: Installing a Network
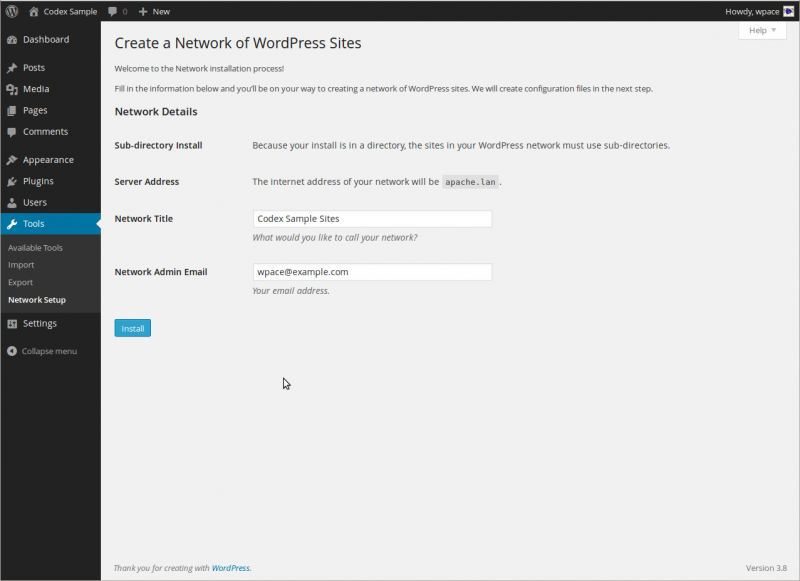
open: Administration > Tools > Network Setup.
You must choose one or the other. You can reconfigure your network to use the other choice after installation, despite the advice on the screen, but reconfiguring it might not be easy.
You only need wildcard DNS for on-demand domain-based sites, despite the advice that may be on the screen.
Once more: See Before You Create A Network.
Sub-domains — a domain-based network in which on-demand sites use subdomains
Sub-directories — a path-based network in which on-demand sites use paths
Network Details
These are filled in automatically, but you can make changes.
Server Address
The domain of the URL you are using to access your WordPress installation.
Network Title
The title of your network as a whole.
Admin E-mail Address
Your email address as super admin of the network as a whole.
Double-check the details and press the Install button.
Step 4: Enabling the Network
Back up your existing wp-config.php and .htaccess files, unless this is a fresh install and you have nothing to lose.
There are two steps:
1. Add the specified lines to your wp-config.php file
The extra lines go just after where you added the line in Step 1: Prepare Your WordPress.
2. Add the specified lines to your .htaccess file
If you do not have a .htaccess file, then create it in the same directory as your wp-config.php file.
If you ALREADY have a .htaccess file, replace any existing WP lines with these new ones.
In some cases you might also have to add Options FollowSymlinks at the start of the file.
After completing these steps, log in again using the link provided. You might have to clear your browser's cache and cookies in order to log in.
Step 5: Network Admin Settings
At the left of your WordPress toolbar, My Sites is now the second item. There, all your sites are listed, with handy fly-out menus, as well as a Network Admin menu item. Under Network Admin you can use the Dashboard item to go to the Network Dashboard screen.
Step 1: Prepare Your WordPress
Your existing WordPress site will be updated when creating a network.
Unless this is a fresh install and you have nothing to lose, please backup your database and files.
Verify that Pretty Permalinks work on your single WP instance.
Also deactivate all active plugins. You can reactivate them again after the network is created.
Step 2: Allow Multisite
Open up >site root folder Edit wp-config.php and add this line above where it says /* That's all, stop editing! Happy blogging. */. If it doesn't say that anywhere, then add the line somewhere above the first line that begins with require or include:
/* Multisite */
define( 'WP_ALLOW_MULTISITE', true );
You will need to refresh your browser to continue.
Step 3: Installing a Network
open: Administration > Tools > Network Setup.
You must choose one or the other. You can reconfigure your network to use the other choice after installation, despite the advice on the screen, but reconfiguring it might not be easy.
You only need wildcard DNS for on-demand domain-based sites, despite the advice that may be on the screen.
Once more: See Before You Create A Network.
Sub-domains — a domain-based network in which on-demand sites use subdomains
Sub-directories — a path-based network in which on-demand sites use paths
Network Details
These are filled in automatically, but you can make changes.
Server Address
The domain of the URL you are using to access your WordPress installation.
Network Title
The title of your network as a whole.
Admin E-mail Address
Your email address as super admin of the network as a whole.
Double-check the details and press the Install button.
Back up your existing wp-config.php and .htaccess files, unless this is a fresh install and you have nothing to lose.
There are two steps:
1. Add the specified lines to your wp-config.php file
The extra lines go just after where you added the line in Step 1: Prepare Your WordPress.
2. Add the specified lines to your .htaccess file
If you do not have a .htaccess file, then create it in the same directory as your wp-config.php file.
If you ALREADY have a .htaccess file, replace any existing WP lines with these new ones.
In some cases you might also have to add Options FollowSymlinks at the start of the file.
After completing these steps, log in again using the link provided. You might have to clear your browser's cache and cookies in order to log in.
Step 5: Network Admin Settings
At the left of your WordPress toolbar, My Sites is now the second item. There, all your sites are listed, with handy fly-out menus, as well as a Network Admin menu item. Under Network Admin you can use the Dashboard item to go to the Network Dashboard screen.
More Details: http://codex.wordpress.org/Create_A_Network


