29 Nov 2014

Enable WordPress Permalinks on Windows IIS

WordPress is written in PHP, and generally php runs better under apache on Linux, but you can run it on IIS on Windows machines. In fact this blog is running under Windows.*

If you find you have changed the permalinks options in your wordpress installation, but you find they don’t work,  first check if you are running on a Windows machine. On a shared hosting account, it should have said whether it was windows or linux, but at the least, if you have the option for asp.net, then you are on windows.

If you are on a Linux machine under apache, there are loads of resources for making sure permalink rewrites work. Running WordPress on windows however is much less common, so I thought I would post a quick fix for getting it to run under IIS7.

The trick involves adding a web.config file to your base installation. A web.config file is a configuration file used by Windows specifically for .net, but in this case if you are running wordpress you can trick IIS into passing the buck on files it can’t find to WordPress, that then handles it.

Simply ensure the URL Rewrite module is enabled on the IIS server (lots of hosts, including GoDaddy, have this enabled, but talk to your hosting company if it doesn’t), then add the following web.config file to the base of your WordPress installation.

Solution

Step: 01
>Open up a text editor and create a new file
>Copy/paste in the code that follows(code 1 or code 2) into your new text file.
>Save the file as web.config
>Upload the file to the root of your WordPress installation

Step: 02
>Log into your WordPress install  Dashboard –> Settings –> Permalinks and set it to Post name and click Save Changes.

You should now have Pretty Permalinks on a Windows server!

Code 1

<rewrite>
 <rules>
 <rule name="Main Rule" stopProcessing="true">
 <match url=".*" />
 <conditions logicalGrouping="MatchAll">
 <add input="{REQUEST_FILENAME}" matchType="IsFile" negate="true" />
 <add input="{REQUEST_FILENAME}" matchType="IsDirectory" negate="true" />
 </conditions>
 <action type="Rewrite" url="index.php" />
 </rule>
 </rules>

</rewrite>


Code 2

<?xml version="1.0"?>

<configuration>

  <system.webServer>

    <rewrite>

      <rules>

        <rule name="Main Rule" stopProcessing="true">

          <match url=".*" />

          <conditions logicalGrouping="MatchAll">

            <add input="{REQUEST_FILENAME}" matchType="IsFile" negate="true" />

            <add input="{REQUEST_FILENAME}" matchType="IsDirectory" negate="true" />

          </conditions>

          <action type="Rewrite" url="index.php" />

        </rule>

      </rules>

    </rewrite>

  </system.webServer>


</configuration>

29 Oct 2014

What is short open tag in php

<?= is not equal with <?php.

<?= is the short open tag for <?php echo

<? is the short open Tag for <?php

You can use short open tags by activate short_open_tag in the php.ini.


How to Enable "short open Tag":


Method 01
Go to php.ini and set short_open_tag = On

and then finally restart your server


Method 02

You should be able to change it in your .htaccess file if it wasn't locked down

<IfModule mod_php5.c>
   php_value short_open_tag 1
 </IfModule>

25 Oct 2014

How to change PrestaShop admin Password using Database

Step :01
Go to the PrestaShop root folder and find the config folder. This will take you to a list of all files within that folder.select-config-folder

Step :02

Look for the settings.inc.php file.

Step :03
Once inside the settings.inc.php file, locate the setting named _COOKIE_KEY and copy the string value. You may want to save it temporarily to a word processing document such as notepad.

Step :04
Go to the database and select the one named ps_employee.
Note that your PrestaShop database prefix might not begin with ps_

Step :05

This opens the table data information. Find your admin user from the list of data rows.

Step :06
Find the password row, it is named passwd. There are two columns you will need to edit. The first is the Function column. Use the dropdown and select the MD5 option. The second column is the Value column. For this column, paste the _COOKIE_KEY value you saved earlier and attach your new password directly to the end of the key with no spaces. Be sure to use a real password and not anything easy like NEWPASS1234 that we used in the example.


Step :07

Then click the GO button to save the new information.

Now login the admin panel.

How To Install WordPress Plugin Without Using FTP

You are not able to update/upgrade your WordPress and plugins to a newer version without providing your FTP connection information. This is a common issue whereby the WordPress system can’t write to your /wp-content folder directly.

To solve this issue you need to define the FTP details in your wp-config.php file so WordPress will remember it. Alternatively, you may also provide WordPress with write access to your /wp-content folder by accessing the FTP root file and changing the folder file permission (CHMOD) to 775 rather than the default 755 and 644.

There is however an easier way to deal with this; by defining constant, FS_METHOD in your wp-config.php file. This bypasses WordPress’s recurring prompts, and allows auto-updates of your files to happen. And it takes only 1 line of code to do this.

Step 1. Open /Wp-Config.Php

Now the first thing you need to do is to open the wp-config.php file from your WordPress root folder (you may access this file from your WordPress installer folder). From the installation folder, the file is located at wordpress/wp-config.php

Step 2. Insert FS_METHOD

Paste the following code to your wp-config.php file, preferably just below every other line of code.

define('FS_METHOD','direct');

Step 3. Save And Upload

When you have already pasted the one-line code, you can proceed to upload the file to your WordPress root folder on your server, and it should work right away. Uploading can be done directly from your host control panel.

24 Oct 2014

How to check php version in website

Creating a PHP info page in Website


Using the steps below I'll show you how to create a PHP info page that will allow you to not only see your PHP version, but also all the PHP options that are currently in use.

Step :01

Login to your cPanel.

Step :02
Under the Files section, click on File Manager, then select Web Root and click on Go.

Step :03
At the top-left, click on + New File, name the file info.php and click on Create New File.

Step :04
Now open the file with the Code Editor in cPanel and enter in the following code:
<?php
phpinfo();
?>

Then click on Save Changes at the top-right hand corner of the screen.

Step :05
Now if you visit your website such as http://example.com/info.php you should see the PHP info page. This example screen shot shows that this server is running PHP version 5.2.17, and that the PHP configurations are getting loaded from the file /home/userna5/public_html/php.ini


php info page

Step :06
You can scroll further down the PHP info page, to also see individual PHP options that you can set.

16 Oct 2014

Excerpt or Content Word Limit in WordPress

This is just a revamp of a function I wrote a while back to add the ability to limit the number of words displayed when you call the excerpt or content. As it stands, the max number of words for the excerpt is 55.

Add the following code to your functions.php file.

function excerpt($limit) {
  $excerpt = explode(' ', get_the_excerpt(), $limit);
  if (count($excerpt)>=$limit) {
    array_pop($excerpt);
    $excerpt = implode(" ",$excerpt).'...';
  } else {
    $excerpt = implode(" ",$excerpt);
  }
  $excerpt = preg_replace('`\[[^\]]*\]`','',$excerpt);
  return $excerpt;
}

function content($limit) {
  $content = explode(' ', get_the_content(), $limit);
  if (count($content)>=$limit) {
    array_pop($content);
    $content = implode(" ",$content).'...';
  } else {
    $content = implode(" ",$content);
  }
  $content = preg_replace('/\[.+\]/','', $content);
  $content = apply_filters('the_content', $content);
  $content = str_replace(']]>', ']]&gt;', $content);
  return $content;
}


Now, instead of using the_content() or the_excerpt in your loop, use excerpt($limit) or content($limit).

If you want to limit your excerpt to 25 words the code would look like this:

Use this PHP code:
<?php echo excerpt(25); ?>

14 Oct 2014

Sending Simple HTML Email with PHP

It's Not Much Different Than Text Email

Sending HTML Email through PHP uses the exact same mail function as text email:

Code 01:
mail($to, $subject, $message, $headers);

The last parameter, the headers, are optional for the function but required for sending HTML email, as this is where we are able to pass along the Content-Type declaration telling email clients to parse the email as HTML.

In fact, the headers area gives us the opportunity to do lots of important email functions. This is where we can set the From: and Reply To: settings if need be, as well as CC and BCC other recipients (Hey, a checkbox for CC'ing yourself would be a cool feature to add!). Here is the code used for the new and improved HTML-Sendin' Website Change Request Form:

Code 02:
$to = 'bob@example.com';

$subject = 'Website Change Request';

$headers = "From: " . strip_tags($_POST['req-email']) . "\r\n";
$headers .= "Reply-To: ". strip_tags($_POST['req-email']) . "\r\n";
$headers .= "CC: susan@example.com\r\n";
$headers .= "MIME-Version: 1.0\r\n";
$headers .= "Content-Type: text/html; charset=ISO-8859-1\r\n";


Now We Can Use HTML Tags

The message parameter (a big string we pass to the mail function with the body of our email), can now have HTML tags in it. For example:


Code 03:
$message = '<html><body>';
$message .= '<img src="samx/header.png" alt="Website Change Request" />';
$message .= '<table rules="all" style="border-color: #666;" cellpadding="10">';
$message .= "<tr style='background: #eee;'><td><strong>Name:</strong> </td><td>" . strip_tags($_POST['req-name']) . "</td></tr>";
$message .= "<tr><td><strong>Email:</strong> </td><td>" . strip_tags($_POST['req-email']) . "</td></tr>";
$message .= "<tr><td><strong>Type of Change:</strong> </td><td>" . strip_tags($_POST['typeOfChange']) . "</td></tr>";
$message .= "<tr><td><strong>Urgency:</strong> </td><td>" . strip_tags($_POST['urgency']) . "</td></tr>";
$message .= "<tr><td><strong>URL To Change (main):</strong> </td><td>" . $_POST['URL-main'] . "</td></tr>";
$addURLS = $_POST['addURLS'];
if (($addURLS) != '') {
    $message .= "<tr><td><strong>URL To Change (additional):</strong> </td><td>" . strip_tags($addURLS) . "</td></tr>";
}
$curText = htmlentities($_POST['curText']);          
if (($curText) != '') {
    $message .= "<tr><td><strong>CURRENT Content:</strong> </td><td>" . $curText . "</td></tr>";
}
$message .= "<tr><td><strong>NEW Content:</strong> </td><td>" . htmlentities($_POST['newText']) . "</td></tr>";
$message .= "</table>";
$message .= "</body></html>";


More Details: http://css-tricks.com/sending-nice-html-email-with-php


13 Oct 2014

Creating a basic Joomla! template

Setting up a directory structure


To make the most basic template, create a new folder in the templates folder. Name this folder after your template i.e. mynewtemplate.

Using your favourite text editor create the files index.php and templateDetails.xml. To keep things organized, make 2 new folders called images and css. Inside the css folder create a file called template.css.

Although it is fine to place all your CSS code directly in your index.php file to start, many web developers prefer to place their CSS code in a separate file that can be linked from multiple pages using the link tag. This may also shorten the loading time of your pages, since the separate file can be cached.

This is the most basic practical setup. Outline of folder and file structure:

>mynewtemplate/
>>css/
>>>template.css
>images/
>index.php
>templateDetails.xml

Step: 01

For Joomla 2.5 and later, use the following version. Change version="2.5" into the version of your Joomla! installation.


<?xml version="1.0" encoding="utf-8"?>
<extension version="2.5" type="template">
        <name>mynewtemplate</name>
        <creationDate>2008-05-01</creationDate>
        <author>John Doe</author>
        <authorEmail>john@example.com</authorEmail>
        <authorUrl>http://www.example.com</authorUrl>
        <copyright>John Doe 2008</copyright>
        <license>GNU/GPL</license>
        <version>1.0.2</version>
        <description>My New Template</description>
        <files>
                <filename>index.php</filename>
                <filename>templateDetails.xml</filename>
                <folder>images</folder>
                <folder>css</folder>
        </files>
        <positions>
                <position>breadcrumb</position>
                <position>left</position>
                <position>right</position>
                <position>top</position>
                <position>user1</position>
                <position>user2</position>
                <position>user3</position>
                <position>user4</position>
                <position>footer</position>
        </positions>
</extension>

Step: 02

Creating a basic index.php file

Begin

A Joomla template begins with the following lines:

<?php defined( '_JEXEC' ) or die( 'Restricted access' );?>
<!DOCTYPE html>
<html xmlns="http://www.w3.org/1999/xhtml"
   xml:lang="<?php echo $this->language; ?>" lang="<?php echo $this->language; ?>" >
The first line stops naughty people looking at your coding and getting up to bad things.

The second line is the Document Type Declaration (DOCTYPE), which tells the browser (and web crawlers) which flavor of HTML the page is using. The doctype used above is HTML5, a newer version of HTML that is largely backwards compatible, but contains many new features. You should be aware that this will not work well in Internet Explorer 8 or earlier without a hack. You might want to investigate this situation and your clients' wishes before deciding on which doctype you want to use. However this is used in Joomla Joomla 3.0 and higher.

The third line begins our HTML document and describes what language the website is in. A html document is divided into two parts, head and body. The head will contain the information about the document and the body will contain the website code which controls the layout.

Head

<head>
<jdoc:include type="head" />
<link rel="stylesheet" href="<?php echo $this->baseurl ?>/templates/system/css/system.css" type="text/css" />
<link rel="stylesheet" href="<?php echo $this->baseurl ?>/templates/system/css/general.css" type="text/css" />
<link rel="stylesheet" href="<?php echo $this->baseurl ?>/templates/<?php echo $this->template; ?>/css/template.css" type="text/css" />
</head>
The first line gets Joomla to put the correct header information in. This includes the page title, meta information as well as system JavaScript. The rest creates links to two system style sheets and to your own style sheet (if it's named template.css and is located in the css folder of your template directory. So if your temlate is in http://www.mysite.com/templates/my_template/ then the css files will go in http://www.mysite.com/templates/my_template/css/).

Body Section

<body>
<jdoc:include type="modules" name="top" />
<jdoc:include type="component" />
<jdoc:include type="modules" name="bottom" />
</body>
Amazingly, this will suffice! Yes, it's a very basic layout, but it will do the job. Everything else will be done by Joomla!. These lines, usually called jdoc statements, tell Joomla to include output from certain parts of the Joomla system. Note: you will need to ensure your menu is set to go into the "top" module position.

Module Positions

Above, the line which says name="top" adds a module position called top and allows Joomla to place modules into this section of the template. The type="component" line contains all articles and main content (actually, the component) and is very important. It goes in the centre of the template.

Note: You can add your own module lines anywhere you want in the body, but you have to add a corresponding line to the templateDetails.xml file which sits alongside the index.php of your template.

End

Finish it off - one last bit:

</html>

Custom Images

If you want to add any images to the template you can do so like this:

<img src="<?php echo $this->baseurl; ?>/images/stories/myimage.png" alt="Custom image" class="customImage" />
Here the baseurl variable will fill in the path to your template for you.

Custom CSS

You can add custom css like this:

<link rel="stylesheet" href="<?php echo $this->baseurl ?>/templates/<?php echo $this->template;?>/css/styles.css" type="text/css" />
Every file which is added must have a line in the templateDetails.xml file for the template.

This leaves a final file of:

<?php defined( '_JEXEC' ) or die( 'Restricted access' );?>
<!DOCTYPE html>
<html xml:lang="<?php echo $this->language; ?>" lang="<?php echo $this->language; ?>" >
<head>
<jdoc:include type="head" />
<link rel="stylesheet" href="<?php echo $this->baseurl ?>/templates/mynewtemplate/css/template.css" type="text/css" />
</head>
<body>
<jdoc:include type="modules" name="top" />
<jdoc:include type="component" />
<jdoc:include type="modules" name="bottom" />
</body>
</html>

More Details: http://docs.joomla.org/Creating_a_basic_Joomla!_template

11 Jul 2014

Php Open-source Click 001


>Moodle - Open-source learning platform
A free, open-source PHP web application for producing modular internet-based courses that support a modern social constructionist pedagogy.

https://moodle.org


>Osclass
Osclass is an open source project that allows you to easily create a classifieds website.

Get your own classified website with Osclass for free. Build your own Osclass installation and start advertising real estate, jobs or whatever you want- in minutes!

http://osclass.org

3 Jul 2014

How to show all categories and posts in wordpress page?

Create new wordpress template and past the following code

<?php
/**
 * Template Name: all categories and posts Template
 * Description: Show all categories and posts Template.
 *
 *
*/
?>

<?php get_header(); ?>

<?php
//get all categories then display all posts in each term
$taxonomy = 'category';
$param_type = 'category__in';
$term_args=array(
  'orderby' => 'name',
  'order' => 'ASC'
);
$terms = get_terms($taxonomy,$term_args);
if ($terms) {
  foreach( $terms as $term ) {
    $args=array(
      "$param_type" => array($term->term_id),
      'post_type' => 'post',
      'post_status' => 'publish',
     // 'posts_per_page' => -1,
      'caller_get_posts'=> 1
      );
    $my_query = null;
    $my_query = new WP_Query($args);
    if( $my_query->have_posts() ) {  ?>
      <div class="category section">
        <h3><?php echo $term->name;?></h3>
        <ul>
        <?php
      while ($my_query->have_posts()) : $my_query->the_post(); ?>
        <li><a href="<?php the_permalink() ?>" rel="bookmark" title="Permanent Link to <?php the_title_attribute(); ?>"><?php the_title(); ?></a></li>
       <?php
      endwhile;
      ?>
      </ul>
      </div>
 <?php
    }
  }
}
wp_reset_query();  // Restore global post data stomped by the_post().
?>

<?php get_sidebar(); ?>
<?php get_footer(); ?>

28 Jun 2014

How to: Enable HTTP Keep-Alive in WordPress?

We usually enable HTTP keep-alive because it responses to header by keeping the client/server connection open across multiple server requests. The open connection improves the web performance when a client makes multiple server requests for webpage content, because the server can return the content for each request more quickly rather than processing all requests at once. Or if we don’t enable HTTP Keep-Alive, the server got to open a new connection for every single request.

To enable HTTP keep-alive response header in your WordPress blog all you have to do is to locate the following line codes in your blog’s .htaccess file. Or if you don’t know how to edit .htaccess file in WordPress, click here.

Locate the Code in .htaccess
1
2
3
<IfModule mod_headers.c>
Header set Connection keep-alive
</IfModule>

htaccess File Snippets You Should Have Handy

Everyone will be familiar with tip number four, which is the classic 301 redirect that SEOs have come to know and love. However, the other tips in this list are less common, but are quite useful to know when you need them. After you've read this post, bookmark it, and hopefully it will save you some time in the future.

1) Make URLs SEO-friendly and future-proof

Back when I was more of a developer than an SEO, I built an e-commerce site selling vacations, with a product URL structure:
/vacations.php?country=italy
A nicer URL would probably be:
/vacations/italy/
The second version will allow me to move away from PHP later, it is probably better for SEO, and allows me to even put further sub-folders later if I want. However, it isn't realistic to create a new folder for every product or category. Besides, it all lives in a database normally.
Apache identifies files and how to handle them by their extensions, which we can override on a file by file basis:
<Files magic>
ForceType application/x-httpd-php5
</Files>
This will allow the 'magic' file, which is a PHP file without an extension, to then look like a folder and handle the 'inner' folders as parameters. You can test it out here (try changing the folder names inside the magic 'folder'):

2) Apply rel="canonical" to PDFs and images

The SEO community has adopted rel="canonical" quickly, and it is usually kicked around in discussions about IA and canonicalization issues, where before we only had redirects and blocking to solve a problem. It is a handy little tag that goes in the head section of an HTML page.
However, many people still don't know that you can apply rel="canonical" in an alternative way, using HTTP, for cases where there is no HTML to insert a tag into. An often cited example that can be used for applying rel="canonical" to PDFs is to point to an HTML version or to the download page for a PDF document.
An alternative use would be for applying rel="canonical" to image files. This suggestion came from a client of mine recently, and is something a couple of us had kicked about once before in the Distilled office. My first reaction to the client was that this practice sounded a little bit 'dodgy,' but the more I think about it, the more it seems reasonable.
They had a product range that attracts people to link to their images, but that isn't very helpful to them in terms of SEO (any traffic coming from image search is unlikely to convert), but rel="canonical" those links to images to the product page, and suddenly they are helpful links, and the rel="canonical" seems pretty reasonable.
Here is an example of applying HTTP rel="canonical" to a PDF and a JPG file:
<Files download.pdf>
Header add Link '<http://www.tomanthony.co.uk/httest/pdf-download.html>; rel="canonical"'
</Files>
 
<Files product.jpg>
Header add Link '<http://www.tomanthony.co.uk/httest/product-page.html>; rel="canonical"'
</Files>
We could also use some variables magic (you didn't know .htaccess could do variables!?) to apply this to all PDFs in a folder, linking back the HTML page with the same name (be careful with this if you are unsure):
RewriteRule ([^/]+)\.pdf$ - [E=FILENAME:$1]
<FilesMatch "\.pdf$">
Header add Link '<http://www.tomanthony.co.uk/httest/%{FILENAME}e.html>; rel="canonical"'
</FilesMatch>
You can read more about it here:

3) Robots directives

You can't instruct all search engines not to index a page, unless you allow them to access the page. If you block a page with robots.txt, then Google might still index it if it has a lot of links pointing to it. You need to put the noindex Meta Robots tag on every page you want to issue that instruction on. If you aren't using a CMS or are using one that is limited in its ease, this could be a lot of work. .htaccess to the rescue!
You can apply directives to all files in a directory by creating an .htaccess file in that directory and adding this command:
Header set X-Robots-Tag "noindex, noarchive, nosnippet"
If you want to read a bit more about this, I suggest this excellent post from Yoast: 

4) Various types of redirect

The common SEO redirect is ensuring that a canonical domain is used, normally www vs. non-www. There are also a couple of other redirects you might find useful. I have kept them simple here, but often times you will want to combine these to ensure you avoid chaining redirects:
# Ensure www on all URLs.
RewriteCond %{HTTP_HOST} ^example.com [NC]
RewriteRule ^(.*)$ http://www.example.com/$1 [L,R=301]
 
# Ensure we are using HTTPS version of the site.
RewriteCond %{HTTPS} !on
RewriteRule (.*) https://%{HTTP_HOST}%{REQUEST_URI} [L,R=301]
 
# Ensure all URLs have a trailing slash.
RewriteBase /
RewriteCond %{REQUEST_FILENAME} !-f
RewriteCond %{REQUEST_URI} !(.*)/$
RewriteRule ^(.*)$ http://www.example.com/$1/ [L,R=301]

5) Custom 404 error page

None of your visitors should be seeing a white error page with black techno-babble when they end up on at a broken URL. You should always be serving a nice 404 page which also gives the visitor links to get back on track.
You can also end up getting lots of links and traffic if you but your time and effort into a cool 404 page, like Distilled's:
This is very easy to setup with .htaccess:
ErrorDocument 404 /cool404.html
 
# Can also do the same for other errors...
ErrorDocument 500 /cool500.html

6) Send the Vary header to help crawl mobile content

If you are serving a mobile site on the same URLs as your main site, but rather than using responsive design you are altering the HTML, then you should be using the 'Vary' header to let Google know that the HTML changes for mobile users. This helps them to crawl and index your pages more appropriately:
Again, this is pretty simple to achieve with your .htaccess file, independent of your CMS or however your are implementing the HTML variations:
Header append Vary User-Agent

7) Improve caching for better site speed

There is an increasing focus on site speed, both from SEOs (because Google cares) and also from developers who know that more and more visitors are coming to sites over mobile connections.
You should be careful with this tip to ensure there aren't already caching systems in place, and that you choose appropriate caching length. However, if you want a quick and easy solution to set the number of seconds, you can use the below. Here I set static files to cache for 24 hours:
<FilesMatch ".(flv|gif|jpg|jpeg|png|ico|swf|js|css|pdf)$">
Header set Cache-Control "max-age=28800"
</FilesMatch>

8) An Apple-style 'Back Soon' maintenance page

Apple famously shows a 'Back Soon' note when they take their store down temporarily during product announcements, before it comes back with shiny new products to love or hate. When you are making significant changes to redirect users to such a page, a message such as this can be quite useful. However, it can also make it tough to check the changes you've made.
With this bit of .htaccess goodness, you can redirect people based on their IP address, so you can redirect everyone but your IP address and 127.0.0.1 (this is a special 'home' IP address):
RewriteCond %{REMOTE_ADDR}  !your_ip_address
RewriteCond %{REMOTE_ADDR}  !127.0.0.1
RewriteRule !offline.php$ http://www.example.com/back_soon.html [L,R=307]

9) Smarten up your URLs even when your CMS says "No!"

One of the biggest complaints I hear amongst SEOs is about how much this or that CMS "sucks." It can be intensely frustrating for an SEO when they are hampered by the restraints of a certain CMS, and one of those constraints is often that you are stuck with appaling URLs.
You can overcome this, turning product.php?id=3123 into /ray-guns/ in no time at all:
# Rewrite a specific product...
RewriteRule ray-guns/ product.php?id=3123
 
# ... or groups of them
RewriteRule product/([0-9]+)/ product.php?id=$1
This won't prevent people from visiting the crappy versions of the URLs, but combined with other redirects (based on IP) or with judicious use of rel="canonical," you improve the situation tremendously. Don't forget to update your internal links to the new ones. :)

10)  Recruit via your HTTP headers

Ever looked closely at SEOmoz's HTTP headers? You might have missed the opportunity to get a job...
If you would like to add a custom header to your site, you can make up whatever headers and values you'd like:
Header set Hiring-Now "Looking for a job? Email us!"
It can be fun to leave messages for people poking around - I'll leave it to your imaginations! :)

13 May 2014

PHP OOPS Interview Questions & Answers

1) Explain what is object oriented programming language?
Object oriented programming language allows concepts such as modularity, encapsulation, polymorphism and inheritance.  Objects are said to be the most important part of object oriented language. Concept revolves around making simulation programs around an object. Organize a program around its data (object)& set well define interface to that data. i.e. objects and a set of well defined interfaces to that data. OOP is the common abbreviation for Object-Oriented Programming.  OOps have many properties such as DataHiding,Inheritence,Data Absraction,Data Encapsulation and many more.
2) Name some languages which have object oriented language and characteristics?
Some of the languages which have object oriented languages present in them are ABAP, ECMA Script, C++, Perl, LISP, C#, Tcl, VB, Ruby, Python, PHP, etc. Popularity of these languages has increased considerably as they can solve complex problems with ease.
3) Explain about UML?
UML or unified modeling language is regarded to implement complete specifications and features of object oriented language. Abstract design can be implemented in object oriented programming languages. It lacks implementation of polymorphism on message arguments which is a OOPs feature.
4) Explain the meaning of object in object oriented programming?
Languages which are called as object oriented almost implement everything in them as objects such as punctuations, characters, prototypes, classes, modules, blocks, etc. They were designed to facilitate and implement object oriented methods.
5) Explain about message passing in object oriented programming?
Message passing is a method by which an object sends data to another object or requests other object to invoke method. This is also known as interfacing. It acts like a messenger from one object to other object to convey specific instructions.
6) State about Java and its relation to Object oriented programming?
Java is widely used and its share is increasing considerably which is partly due to its close resemblance to object oriented languages such as C++. Code written in Java can be transported to many different platforms without changing it. It implements virtual machine.
7) What are the problems faced by the developer using object oriented programming language?
These are some of the problems faced by the developer using object oriented language they are: -
a) Object oriented uses design patterns which can be referred to as anything in general.
b) Repeatable solution to a problem can cause concern and disagreements and it is one of the major problems in software design.
8 ) State some of the advantages of object oriented programming?
Some of the advantages of object oriented programming are as follows: -
a) A clear modular structure can be obtained which can be used as a prototype and it will not reveal the mechanism behind the design. It does have a clear interface.
b) Ease of maintenance and modification to the existing objects can be done with ease.
c) A good framework is provided which facilitates in creating rich GUI applications.
9 ) Explain about inheritance in OOPS?
Objects in one class can acquire properties of the objects in other classes by way of inheritance. Reusability which is a major factor is provided in object oriented programming which adds features to a class without modifying it. New class can be obtained from a class which is already present.
10) Explain about the relationship between object oriented programming and databases?
Object oriented programming and relational database programming are almost similar in software engineering. RDBMS will not store objects directly and that’s where object oriented programming comes into play. Object relational mapping is one such solution.
11) Explain about a class in OOP?
In Object oriented programming usage of class often occurs. A class defines the characteristics of an object and its behaviors. This defines the nature and functioning of a specified object to which it is assigned. Code for a class should be encapsulated.
12) Explain the usage of encapsulation?
Encapsulation specifies the different classes which can use the members of an object. The main goal of encapsulation is to provide an interface to clients which decrease the dependency on those features and parts which are likely to change in future. This facilitates easy changes to the code and features.
13) Explain about abstraction?
Abstraction can also be achieved through composition. It solves a complex problem by defining only those classes which are relevant to the problem and not involving the whole complex code into play.
14) Explain what a method is?
A method will affect only a particular object to which it is specified. Methods are verbs meaning they define actions which a particular object will perform. It also defines various other characteristics of a particular object.
15) Name the different Creational patterns in OO design?
There are three patterns of design out of which Creational patterns play an important role the various patterns described underneath this are: -
a) Factory pattern
b) Single ton pattern
c) Prototype pattern
d) Abstract factory pattern
e) Builder pattern
16) Explain about realistic modeling?
As we live in a world of objects, it logically follows that the object oriented approach models the real world accurately. The object oriented approach allows you to identify entities as objects having attributes and behavior.
17) Explain about the analysis phase?
The anlaysis or the object oriented analysis phase considers the system as a solution to a problem in its environment or domain. Developer concentrates on obtaining as much information as possible about the problem. Critical requirements needs to be identified.
************************************************************************************************************
1) Explain the rationale behind Object Oriented concepts?
Object oriented concepts form the base of all modern programming languages. Understanding the basic concepts of object-orientation helps a developer to use various modern day programming languages, more effectively.
2) Explain about Object oriented programming?
Object oriented programming is one of the most popular methodologies in software development. It offers a powerful model for creating computer programs. It speeds the program development process, improves maintenance and enhances reusability of programs.
3) Explain what is an object?
An object is a combination of messages and data. Objects can receive and send messages and use messages to interact with each other. The messages contain information that is to be passed to the recipient object.
4) Explain the implementation phase with respect to OOP?
The design phase is followed by OOP, which is the implementation phase. OOP provides specifications for writing programs in a programming language. During the implementation phase, programming is done as per the requirements gathered during the analysis and design phases.
5) Explain about the Design Phase?
In the design phase, the developers of the system document their understanding of the system. Design generates the blue print of the system that is to be implemented. The first step in creating an object oriented design is the identification of classes and their relationships.
6) Explain about a class?
Class describes the nature of a particular thing. Structure and modularity is provided by a Class in object oriented programming environment. Characteristics of the class should be understandable by an ordinary non programmer and it should also convey the meaning of the problem statement to him. Class acts like a blue print.
7) Explain about instance in object oriented programming?
Every class and an object have an instance. Instance of a particular object is created at runtime. Values defined for a particular object define its State. Instance of an object explains the relation ship between different elements.
8 ) Explain about inheritance?
Inheritance revolves around the concept of inheriting knowledge and class attributes from the parent class. In general sense a sub class tries to acquire characteristics from a parent class and they can also have their own characteristics. Inheritance forms an important concept in object oriented programming.
9) Explain about multiple inheritance?
Inheritance involves inheriting characteristics from its parents also they can have their own characteristics. In multiple inheritance a class can have characteristics from multiple parents or classes. A sub class can have characteristics from multiple parents and still can have its own characteristics.
10) Explain about encapsulation?
Encapsulation passes the message without revealing the exact functional details of the class. It allows only the relevant information to the user without revealing the functional mechanism through which a particular class had functioned.
11) Explain about abstraction?
Abstraction simplifies a complex problem to a simpler problem by specifying and modeling the class to the relevant problem scenario. It simplifies the problem by giving the class its specific class of inheritance. Composition also helps in solving the problem to an extent.
12) Explain the mechanism of composition?
Composition helps to simplify a complex problem into an easier problem. It makes different classes and objects to interact with each other thus making the problem to be solved automatically. It interacts with the problem by making different classes and objects to send a message to each other.
13) Explain about polymorphism?
Polymorphism helps a sub class to behave like a parent class. When an object belonging to different data types respond to methods which have a same name, the only condition being that those methods should perform different function.
14) Explain about overriding polymorphism?
Overriding polymorphism is known to occur when a data type can perform different functions. For example an addition operator can perform different functions such as addition, float addition etc. Overriding polymorphism is generally used in complex projects where the use of a parameter is more.
15) Explain about object oriented databases?
Object oriented databases are very popular such as relational database management systems. Object oriented databases systems use specific structure through which they extract data and they combine the data for a specific output. These DBMS use object oriented languages to make the process easier.
16) Explain about parametric polymorphism?
Parametric polymorphism is supported by many object oriented languages and they are very important for object oriented techniques. In parametric polymorphism code is written without any specification for the type of data present. Hence it can be used any number of times.
17) What are all the languages which support OOP?
There are several programming languages which are implementing OOP because of its close proximity to solve real life problems. Languages such as Python, Ruby, Ruby on rails, Perl, PHP, Coldfusion, etc use OOP. Still many languages prefer to use DOM based languages due to the ease in coding.

21 Feb 2014

How to Create Wordpress Multisite?

>As of WordPress 3.0, you have the ability to create a network of sites by using the multisite feature.

Step 1: Prepare Your WordPress

Your existing WordPress site will be updated when creating a network.

Unless this is a fresh install and you have nothing to lose, please backup your database and files.

Verify that Pretty Permalinks work on your single WP instance.

Also deactivate all active plugins. You can reactivate them again after the network is created.


Step 2: Allow Multisite

Open up >site root folder Edit wp-config.php and add this line above where it says /* That's all, stop editing! Happy blogging. */. If it doesn't say that anywhere, then add the line somewhere above the first line that begins with require or include:

/* Multisite */
define( 'WP_ALLOW_MULTISITE', true );

You will need to refresh your browser to continue.

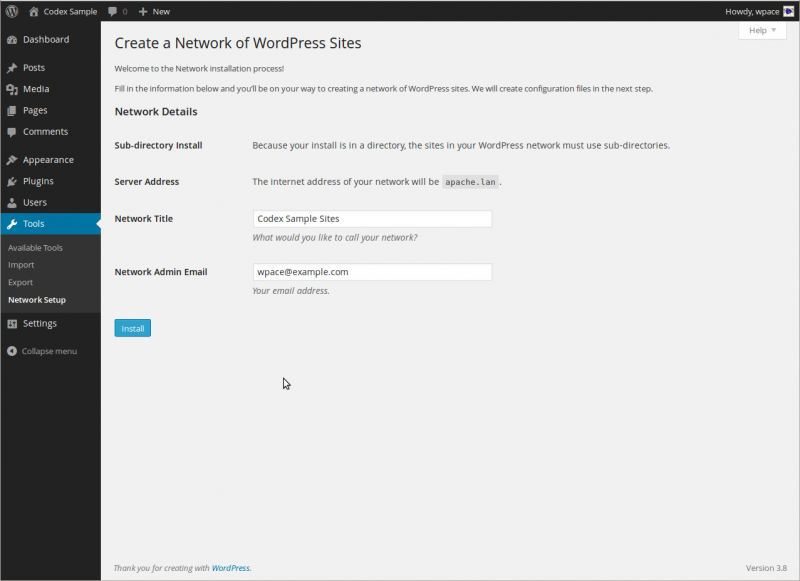
Step 3: Installing a Network

open: Administration > Tools > Network Setup.

You must choose one or the other. You can reconfigure your network to use the other choice after installation, despite the advice on the screen, but reconfiguring it might not be easy.

You only need wildcard DNS for on-demand domain-based sites, despite the advice that may be on the screen.

Once more: See Before You Create A Network.

Sub-domains — a domain-based network in which on-demand sites use subdomains
Sub-directories — a path-based network in which on-demand sites use paths
Network Details

These are filled in automatically, but you can make changes.

Server Address
The domain of the URL you are using to access your WordPress installation.
Network Title
The title of your network as a whole.
Admin E-mail Address
Your email address as super admin of the network as a whole.

Double-check the details and press the Install button.

Step 4: Enabling the Network

Back up your existing wp-config.php and .htaccess files, unless this is a fresh install and you have nothing to lose.

There are two steps:
1. Add the specified lines to your wp-config.php file
The extra lines go just after where you added the line in Step 1: Prepare Your WordPress.
2. Add the specified lines to your .htaccess file
If you do not have a .htaccess file, then create it in the same directory as your wp-config.php file.
If you ALREADY have a .htaccess file, replace any existing WP lines with these new ones.
In some cases you might also have to add Options FollowSymlinks at the start of the file.

After completing these steps, log in again using the link provided. You might have to clear your browser's cache and cookies in order to log in.

Step 5: Network Admin Settings


At the left of your WordPress toolbar, My Sites is now the second item. There, all your sites are listed, with handy fly-out menus, as well as a Network Admin menu item. Under Network Admin you can use the Dashboard item to go to the Network Dashboard screen.


6 Feb 2014

Google Ecommerce Tracking

Enable Ecommerce tracking

  1. Login into Analytics.
  2. Click Admin from the menu bar at the top of any screen in Analytics.
  3. Use the drop down menus to select the AccountProperty, and View.
  4. Click View Settings.
  5. In the Ecommerce Settings section, click the toggle so it says ON
  6. Click Save at the bottom of the page.

Before Google Analytics can report ecommerce activity for your website, you must enable ecommerce tracking on the view (profile) settings page for your website. After that, you must implement the ga.js ecommerce tracking methods in your shopping cart pages or through your ecommerce software. The collection of ecommerce methods work together to send each user's transaction information to the Google Analytics database as it occurs. In this way, Analytics can link a specific referral source to a conversion or purchase. Most template-driven ecommerce engines can be modified to include this information hidden in the order confirmation page.


More Info:

https://developers.google.com/analytics/devguides/collection/gajs/gaTrackingEcommerce

https://support.google.com/analytics/answer/1009612?hl=en


Google Analytics

How do I use Analytics?

You can use Analytics to track a variety of web-based content.
  • Tracking multiple websites
    Google Analytics will track as many websites as you own! We've provided multiple reporting views in your account, so you can view individual reports for specific domains or subdomains.
  • Tracking your blog, MySpace, or Facebook pages
    To use Google Analytics to track your pages on Facebook, MySpace, WordPress or other solutions, we recommend that you search for 3rd-party widgets that simplify the Analytics set up for pre-defined site templates. You may not be able to use Analytics on sites where you cannot edit the page code (such as on MySpace, for example). However, often you will be able to find plugins or widgets that will help you use Analytics in your page.
  • Tracking visits from RSS feeds
    In order for Google Analytics to track data, it is necessary that the Google Analytics tracking code gets executed. Since most RSS/atom readers cannot execute JavaScript, Analytics will not count pageviews that are loaded through an RSS reader. Analytics requires that the visitor execute a JavaScript file on Google's servers in order to track that pageview.
  • Using Analytics with other web analytics solutions
    You can run Google Analytics in parallel with any third-party or internal solution you've already deployed.

How to create a /robots.txt file

Where to put it

The short answer: in the top-level directory of your web server.

The longer answer:

When a robot looks for the "/robots.txt" file for URL, it strips the path component from the URL (everything from the first single slash), and puts "/robots.txt" in its place.

For example, for "http://www.example.com/shop/index.html, it will remove the "/shop/index.html", and replace it with "/robots.txt", and will end up with "http://www.example.com/robots.txt".

So, as a web site owner you need to put it in the right place on your web server for that resulting URL to work. Usually that is the same place where you put your web site's main "index.html" welcome page. Where exactly that is, and how to put the file there, depends on your web server software.
Remember to use all lower case for the filename: "robots.txt", not "Robots.TXT.

What to put in it

The "/robots.txt" file is a text file, with one or more records. Usually contains a single record looking like this:
User-agent: *
Disallow: /cgi-bin/
Disallow: /tmp/
Disallow: /~joe/
In this example, three directories are excluded.

Note that you need a separate "Disallow" line for every URL prefix you want to exclude -- you cannot say "Disallow: /cgi-bin/ /tmp/" on a single line. Also, you may not have blank lines in a record, as they are used to delimit multiple records.

Note also that globbing and regular expression are not supported in either the User-agent or Disallow lines. The '*' in the User-agent field is a special value meaning "any robot". Specifically, you cannot have lines like "User-agent: *bot*", "Disallow: /tmp/*" or "Disallow: *.gif".
What you want to exclude depends on your server. Everything not explicitly disallowed is considered fair game to retrieve. Here follow some examples:
To exclude all robots from the entire server
User-agent: *
Disallow: /

To allow all robots complete access
User-agent: *
Disallow:
(or just create an empty "/robots.txt" file, or don't use one at all)
To exclude all robots from part of the server
User-agent: *
Disallow: /cgi-bin/
Disallow: /tmp/
Disallow: /junk/
To exclude a single robot
User-agent: BadBot
Disallow: /
To allow a single robot
User-agent: Google
Disallow:

User-agent: *
Disallow: /
To exclude all files except one
This is currently a bit awkward, as there is no "Allow" field. The easy way is to put all files to be disallowed into a separate directory, say "stuff", and leave the one file in the level above this directory:


User-agent: *
Disallow: /~joe/stuff/

Alternatively you can explicitly disallow all disallowed pages:
User-agent: *
Disallow: /~joe/junk.html
Disallow: /~joe/foo.html
Disallow: /~joe/bar.html

5 Jan 2014

How Do I Back Up My MySQL Database in WAMPServer?

>Locate your MySQL database. Open your WAMPServer root folder,
located at C:\wamp by default.

>Next, open the following sub-folders:
"bin," "mysql," "mysqlx.x.x" (where x.x.x stands for your MySQL version number) and then "data."

>Within the data folder you will see all of the MySQL databases created with WAMPServer.


>Copy the folder containing your database. Locate the folder name that matches the name of your database. Right-click the folder and select "Copy."

>Create the backup of your database. Choose the location where you want to store your back-up database, perhaps a separate folder or on a CD.

>After selecting the location, right-click within the folder window and select "Paste." The back-up copy of your MySQL database has been created.